# \[Tutorial\] What are block objects, and how to use them

**URL:** https://forum.makecode.com/t/tutorial-what-are-block-objects-and-how-to-use-them/24274
**Category:** Help
**Tags:** tutorial, extension
**Created:** [November 15, 2023, 5:42pm UTC](https://forum.makecode.com/t/tutorial-what-are-block-objects-and-how-to-use-them/24274 "2023-11-15T17:42:16Z")
**Posts on this page:** 20
**Page:** 1

<div class="post-metadata">

### Author: ![Sarge](https://sea2.discourse-cdn.com/flex020/user_avatar/forum.makecode.com/sarge/32/19590_2.png) [@Sarge](https://forum.makecode.com/u/Sarge)
#### Post date: [November 15, 2023, 5:42pm UTC](https://forum.makecode.com/t/tutorial-what-are-block-objects-and-how-to-use-them/24274/1 "2023-11-15T17:42:16Z")

</div>

**⚠ Very long post ahead (\>3k words) ⚠**

This tutorial was requested by @Luke.  
And it’s about time I got to it. If you guys have any suggestions for future tutorials, make sure to post them, and if any of them stick out to me I might just make them into one 😉 (No promises though!)

* * *

# The block objects extension

For starters, we have to understand what we’re even working with. Luke requested a tutorial of _block objects_ but it’s important to understand that the block objects extension is a direct derivative of JavaScript objects.

That’s why, today, I’ll first teach you what objects really are, and only then translate that knowledge to the extension made for blocks. So, let’s start with a summary of what I’ll go over:

1. Understanding JavaScript / [OOP](https://en.wikipedia.org/wiki/Object-oriented_programming) objects
2. Using objects and working with them
3. Classes and factories
4. Using the `blockObject` extension

So, let’s get to it, shall we?

* * *

> **1. Understanding Objects**
>
> # JS objects for dummies
> 
> ## What are objects for?
> 
> Okay, let’s set the stage. Let’s say you want to create _something_ in your game. Anything, really - but for this example I’ll pretend we want to create a car in our game. Now, let’s say we want to assign some data to that car. The first thought is to set a few variables with each variable representing some attribute.
> 
> Given that we want to describe a car with the attributes `brand`, `model` and `year`, we can write a code snippet resembling something like this:
> 
> ```auto
> // Set each property as a single variable
> let carBrand = "Ford";
> let carModel = "Mustang";
> let carYear = 2020;
> 
> ```
> 
> Now, this brings up a problem - if we want to create multiple instances of the same thing, in this case multiple cars, we’d have to create new variables for each new car, and we’d also have to enumerate them. (eg. `carBrand2`, `carModel2`…)
> 
> This is where objects come in. Objects are just variables that store some attributes, each attached to a key. A key is just a string of characters that you can use to label a value.
> 
> ## How to write objects
> 
> Objects are syntactically writen with curly brackets (`{}`), with keys on one side, separated from their corresponding values with a colon (`:`) - this is called a key-value pair
> 
> ```auto
> // This is a key-value pair!
> key: "value"
> 
> ```
> 
> _Note: You don’t have to name the key - `key`, I’m just doing it as an example here!_  
> Every key-value pair is separated by a comma (`,`)  
> This is important! Writing down objects wrong or missing commas will cause issues!
> 
> Below is a display of what the “car” from above would look like as an object.
> 
> ```js
> //key value
> {brand: "Ford", model: "Mustang", year: 2020}
> 
> ```
> 
> However, this is quite unreadable, and gets messy quickly as you add more key-value pairs, so we’re just going to add some line breaks and space it out (whitespace doesn’t affect functionality!)
> 
> ```js
> {
> //keys, values
> brand: "Ford",
> model: "Mustang",
> year: 2020
> }
> 
> ```
> 
> **Tip:** a single key-value pair is also commonly referred to as a property or attribute of an object. For example, a property of the object above would be ‘brand’, and its corresponding value would be “Ford”  
> Keep this in mind because I’m going to mention properties a lot further in this post.
> 
> ## Common mistakes
> 
> Like I mentioned, writing an object in the wrong way can break your code, so I’ll now show you how to avoid making some common mistakes when writing objects.
> 
> ### Illegal keys
> 
> First, I’ll also have to add something I didn’t mention, but is definitely important - keys must only include alphanumeric characters and underscores (the first character must not be a digit though) For example:
> 
> ```js
> // This is good!
> {myKey_123: "Once I was"}
> 
> // This is wrong! (starts with digit)
> {7years: "old my mama told me"}
> 
> // This will also break! (uses '-' which is invalid)
> {go-make: "yourself some friends"}
> 
> ```
> 
> ### Dangling keys
> 
> By the term _dangling keys_, I’m refering to keys which have no value assigned to them and just leave a spot empty for a value. This is an invalid way to notate that:
> 
> ```js
> // This is invalid syntax!
> {emptyKey: }
> 
> ```
> 
> If you want to create an empty property, you can use the `null` or `undefined` values which are used to properly signify the absence of a value (yes, very ironic)
> 
> ```js
> // This is valid!
> {validEmptyKey: null}
> 
> // And this too!
> {alsoEmptyKey: undefined}
> 
> ```
> 
> ### Dangling commas
> 
> This can be a very common mistake, and also a tough one to spot because the editor isn’t exactly helpful when it comes to pointing it out. Basically, **leaving a comma at the end without defining another key-value pair will throw an error**. Case and point:
> 
> ```js
> {
> key1: "abc",
> key2: 123,
> key3: true, //There's a comma here, but nothing after it!
> }
> 
> ```
> 
> This little code snippet will hit you with the very clear _“Expression expected”_ error message, which usually isn’t very helpful.

> **2. Working with Objects**
>
> # We have an object, now what?
> 
> The first thing to consider is that objects can be assigned to variables, as such
> 
> ```js
> // We asign the object to a variable named 'car'
> let car = {
> brand: "Ford",
> model: "Mustang",
> year: 2020
> }
> 
> ```
> 
> This means we can finally accomplish our previous goal, instancing the “car”, in a way where each car is a single variable
> 
> ```js
> // The first car object
> let car1 = {
> brand: "Ford",
> ...
> }
> 
> // The second car object
> let car2 = {
> brand = "Toyota",
> ...
> }
> 
> ```
> 
> (BTW, I omitted some properties to save space, just imagine the missing properties in place of the triple-dots)
> 
> ## Reading properties
> 
> Once we have an object, we can make use of it.  
> In order to access the object’s properties, we use the `object.key` syntax. For example
> 
> ```js
> // Create an object with the properties 'name' and 'isCool'
> let person = {
> name: "Sarge",
> isCool: true
> }
> 
> // 'person' is the name of our object, and 'name' is the key!
> // Outputs "Sarge"
> console.log(person.name);
> 
> // Outputs true
> console.log(person.isCool);
> 
> ```
> 
> However, be careful, because accessing a non-existent property will throw an error and crash!
> 
> ```js
> let song = {
> name: "Midnight City",
> year: 2005
> }
> 
> console.log(song.name); // "Midnight City"
> console.log(song.year); // 2005
> 
> // This will throw an error because the key 'artist' is not defined
> console.log(song.artist);
> 
> ```
> 
> ## Writing properties
> 
> So, you now know how to access an object’s property. Well, what if you want to change it later? You’d go about it just like changing a normal variable! Like this:
> 
> ```js
> let computer = {
> processor: "Intel i5",
> graphics: "Nvidia GTX 1080"
> }
> 
> console.log(computer.graphics); // "Nvidia GTX 1080"
> 
> // Let's upgrade that graphics card!
> computer.graphics = "Nvidia RTX 3080";
> 
> // This will now output "Nvidia RTX 3080"
> console.log(computer.graphics);
> 
> ```
> 
> As you can see, the syntax is very simple, `object.key = value`.  
> Beware though, just like with reading, the property must exist, otherwise you’ll run into errors!
> 
> ```js
> let fruit = {
> name: "Apple",
> color: "Red"
> }
> 
> // There's no 'price' property defined, so we can't set it!
> fruit.price = 10; // $10 for an apple? What a ripoff!
> 
> ```

> **3. Classes & factories**
>
> # Classes and factories
> 
> Now, what if you wanted to make many instances of an objects? Defining each object manually does not scale well, so we have to come up with a way to automatically create objects from given values.
> 
> For example, referencing the `car` object from above, we’d want to take parameters `brand`, `model` and `year` and convert them to an object. Eg. giving the paramters (“Nissan”, “Skyline”, 1998) should create the object
> 
> ```js
> {
> brand: "Nissan",
> model: "Skyline",
> year: 1998
> }
> 
> ```
> 
> And this is where classes and factories come in! To summarise:
> 
> - **Factories** - methods which create objects
> - **Classes** - object “blueprints” (more detailed explanation below)
> 
> ### Factories
> 
> So, let’s start with factories, since they’re easier to grasp. Like I already noted, a factory in object-oriented programming is usually a method that creates and returns an object. So, let’s see how we can make use of factories.!
> 
> Let’s create a method, named `carFactory` that takes in three parameters: `brand`, `model` and `year`.  
> This method will return an `object` datatype.
> 
> ```auto
> // Define a parameter for each key we'll have in the object
> function carFactory(brand: string, model: string, year: number): object
> 
> ```
> 
> Now, we create an object and return it. We’re also going to assign each parameter to the key with the corresponding name. **Disclaimer: the names of the parameters and keys don’t have to match, but it’s a good idea to match them anyway**
> 
> ```auto
> function carFactory(brand: string, model: string, year: number): object {
> // Create an object with the given parameters and return it
> return {
> brand: brand, 
> /* Here, the left 'brand' is the name we set for our key, 
> and the right one is the parameter from the function */
> model: model,
> year: year
> }
> }
> 
> ```
> 
> Again, this still works with any parameter names (I omitted the types in this example to save space)
> 
> ```js
> /* Now, while this does completely work, it's not a great
> practice since it's unreadable and does not follow conventions.
> Also, it makes no sense */
> function carFactory(a, b, c): object {
> return {
> brand: a, 
> model: b,
> year: c
> }
> }
> 
> ```
> 
> And that’s the gist of factories! We can now instance our car using this factory easily by calling the method. Now a variable which we assign to our factory function call will equal an object with the properties we pass in as parameters.
> 
> ```js
> // car1 is now {brand: "Ford", model: "GT", year: 2004}
> let car1 = carFactory("Ford", "GT", 2004);
> 
> // car2 is now {brand: "Fiat", model: "Punto", year: 2005}
> let car2 = carFactory("Fiat", "Punto", 2005);
> 
> ```
> 
> The reason factories are useful is that we only have to write the structure of the object once (in the factory method return), but for every other instance we just call the factory method!
> 
> ### Classes
> 
> Before I get to explaining, just know what you’re reading has replaced a 5000 character block of text. Yes, I deleted a section of 900 words. It sucked, so I’m replacing it.
> 
> So, now you’ve got factories down (right?), let’s get to classes, shall we?  
> A class is basically a “blueprint” for an object.
> 
> Let’s say we want to create a dog this time, as opposed to a car. The first thing we want to do is define some basic properties a dog might have! For example, a dog can have a name, age and for this example we’ll also add a color.
> 
> Now that we’ve thought of some basic properties, we’ll create a class! In the class, we’ll write down those properties - to actually turn the class into a blueprint. When we want to actually make a dog (and not just a blueprint of a dog), we will **instance** the dog class, which just means we’ll create an object with the properties we set now, as well as values we’ll assign! (This is also called **instancing** )
> 
> I know it might seem like a lot to take in, but follow my lead for now, and let’s write a class together!
> 
> ```js
> // Start by using the 'class' keyword and writing the name of your class
> // For this example, we'll write 'Dog' 
> // (btw, it's a common practice to use CamelCase when naming classes)
> class Dog {
> // Open curly brackets (this is where we write the code)
> }
> 
> ```
> 
> Alright, that’s the basic structure/syntax of a class. Now, let’s add those properties we named. Again, name, age and color. Since we’re using **Type** Script, we’re also going to write the types of those properties.
> 
> For the name and color we’re obviously expecting a `string` (text value) and for the age we’re expecting a `number` (numeric value).
> 
> ```auto
> class Dog {
> // Separate the name of your property and its type with a colon (:)
> // Make sure to end the lines with a semicolon (;)
> name: string;
> age: number;
> color: string;
> }
> 
> ```
> 
> At this point, we already have a functioning class! If we want to instance a “dog” from this class, we can use the `new` keyword. So let’s try that now!
> 
> ```js
> // Class definition, I collapsed it
> class Dog {
> ...
> }
> 
> // The syntax to instance a class is new + name of class + brackets
> // (It will make sense why we're using brackets in a moment)
> let myDog = new Dog();
> 
> ```
> 
> So now, we’ve succesfully instanced a dog object from our class! To confirm, you can check yourself that the `myDog` variable we made is in fact an object.
> 
> ```js
> console.log(typeof myDog); // Outputs 'object'
> 
> ```
> 
> However, there’s a little problem - the object we have now has no values! Remember, we can access the value of an object’s property with the `object.key` syntax.  
> So, checking the values of our newly created instance gives us:
> 
> ```auto
> console.log(myDog.name); // undefined
> console.log(myDog.age); // undefined
> console.log(myDog.color); // undefined
> 
> ```
> 
> All undefined! That’s because we didn’t set any of those values. So our object looks like this:
> 
> ```js
> {
> name: undefined,
> age: undefined,
> color: undefined
> }
> 
> ```
> 
> Now, we could go and define each parameter separately, but at that point, what’s even the purpose? What we’re going to do is create a **factory** inside the class, to help us do this.
> 
> We’re going to give our factory the values we want to assign, and the factory will create the object for us! In OOP, this kind of factory inside of a class has a special name, it’s called a `constructor`! The name of the method might vary, for example we’d call it ` __init__ ` in Python, but the concept is still the same.
> 
> So, let’s start by writing our constructor method. Make sure to put it below the property definitions we wrote earlier, but keep it inside of the class (inside of the curly brackets).
> 
> ```js
> class Dog {
> name: string;
> age: number;
> color: string;
>     
> // Put it here!
> constuctor() {
>     
> }
> }
> 
> ```
> 
> As opposed to most of the other named things I’ve mentioned, this time you **must** name the method `constructor` always! It’s not optional!
> 
> Now, we’re going to create some parameters for our constructor. The parameters you write here will have to be passed in when we instance the class with the `new` keyword like above. Generally, we want to pass anything we want to assign to the object we’re making here. In most cases, that means that we need to write a parameter for every property we’ve defined (in this case too).
> 
> So, let’s define some parameters. The parameters, just like in the factory we wrote above, don’t have to match by name, even though it’s good practice if they do. However, they must match in type.
> 
> ```js
> class Dog {
> name: string;
> age: number;
> color: string;
>     
> // We could have also named them 'a', 'b' and 'c', but why?
> constructor(name: string, age: number, color: string) {
> // We've matched all properties with our parameters!
> }
> }
> 
> ```
> 
> And now you may wonder, how do we _actually_ assign these parameters to the object now? In the factory, we literally just wrote an object with the parameters and returned it, now what?
> 
> Well, that’s where the last OOP keyword for today comes in, `this`! No, I’m serious, the keyword is `this`. So, what’s `this`? (Ha, get it?) Well, `this` is what we’re going to assign the parameters to, since it serves as a means to access the current instance. Basically, when we instance the class, whatever we assign to `this` in the constructor is going to get assigned to the variable we’re assigning the instance to.
> 
> Still don’t get it? Let’s use it on an example! Remember how we assign properties, `object.key = value`, or in this case `this.key = value`.
> 
> ```js
> class Dog {
> ...
> constructor(name: string, age: number, color: string) {
> // Properties are on the left
> // Constructor's parameters are on the right
> this.name = name;
> this.age = age;
> this.color = color;
> 
> // We don't need to return anything!
> }
> }
> 
> ```
> 
> Now, when we instance the class, we need to pass in 3 arguments (values for name, age and color), and the variable we assign the instance to will be the object with those values assigned!
> 
> ```js
> // Don't forget the 'new' keyword
> let myDog = new Dog("Morris", 9, "yellow");
> 
> ```
> 
> The `myDog` variable now looks like this
> 
> ```js
> {
> name: "Morris",
> age: 9,
> color: "yellow"
> }
> 
> ```
> 
> * * *
> 
> And that’s the gist of classes! Quite a lot to take in, right? Don’t worry if you didn’t get it right away, you’ll pick up on it with time and practice.
> 
> Classes also have a lot of other cool tricks like _inheritance_ that I didn’t mention, but that’s a story for another time. I only laid the basics out here, because this is a post about the `blockObject` extension. Speaking of which…

> **4. The blockObject extension**
>
> # The blockObject extension
> 
> That’s right, we’re finally here! After boring you with all of that nonsense, it’s time to introduce the star of the show! (Wait, you did read everything preceeding this, right?) The blockObject extension! I won’t keep you long, partially to give you a break from reading, and partially to preserve my sanity.
> 
> ## Creating objects and storing them
> 
> The main category in the `blockObject` drawer gives us three blocks: one for assigning a block object to a variable, and then two blocks related to attaching objects to sprites.
> 
> What we’re going to do now is simply create an object.
> 
> ![Create object](https://us1.discourse-cdn.com/flex020/uploads/makecode/original/2X/0/02b9c2889a49f949e439fb01d09f5f9ffd744903.png)
> 
> Usually, this would be an empty object `{}` with no properties, but block objects come with a property defined for each type by default (`myNum` for numbers, `myStr` for strings…)  
> This is mandatory since those blocks work based on enums, but I won’t get into the details about that.
> 
> If you have a sprite, you can also attach the object to it and retrieve it later.
> 
> ![Assign object to sprite](https://us1.discourse-cdn.com/flex020/uploads/makecode/original/2X/a/a844469bd55c2dca4d1331ad0318497b364f3b7a.png)
> 
> ## Assigning values to properties
> 
> Now, ususaly we’d define the properties for our object ahead of time, and that way we can assign them at a later time. We’ll do the same thing with block objects, using the set property block. Since it’s based on enums, you have to drag one of the blocks out and just create properties from there, like this.
> 
> ![Create a property](https://us1.discourse-cdn.com/flex020/uploads/makecode/original/2X/2/2f3c99509c4beaa918a7bfbac7445ea85a4c5dd4.png)
> 
> When I press ‘Add a new property’, I can create a new property. Beware though, this property will be locked in as a number. Every property has a specific type, you can access type-specific blocks in the drawer on the side (each type has its own subcategory).
> 
> The available types are (each type also has an array version)
> 
> - Number
> - String
> - Boolean
> - Sprite
> - Image
> - Location (Tilemap)
> - Any (use this if the type you need is not on the list)
> 
> Once you have a property, just put your object variable into the block, select a property and assign a value. Here I’ll replicate the `Dog` object we had in the previous sections.
> 
> ![Assigning values](https://us1.discourse-cdn.com/flex020/uploads/makecode/original/2X/0/03e99907ceaca89155caf3dc86bbd46d007f6480.png)
> 
> ### Reading values from a block object
> 
> In order to get a value assigned to a property of an object, use the `<object> get <type> <key>` block. Make sure that the value
> 
> - a) is set (otherwise you’ll get an undefined value)
> - b) was defined as the same type you’re getting it as
> 
> Here’s an example of getting a property that has been defined and one which has not been defined.
> 
> ![arcade-screenshot (4)](https://us1.discourse-cdn.com/flex020/uploads/makecode/original/2X/5/50aa86e074d045b849bef1059ba0fadbdd8d3291.png)
> 
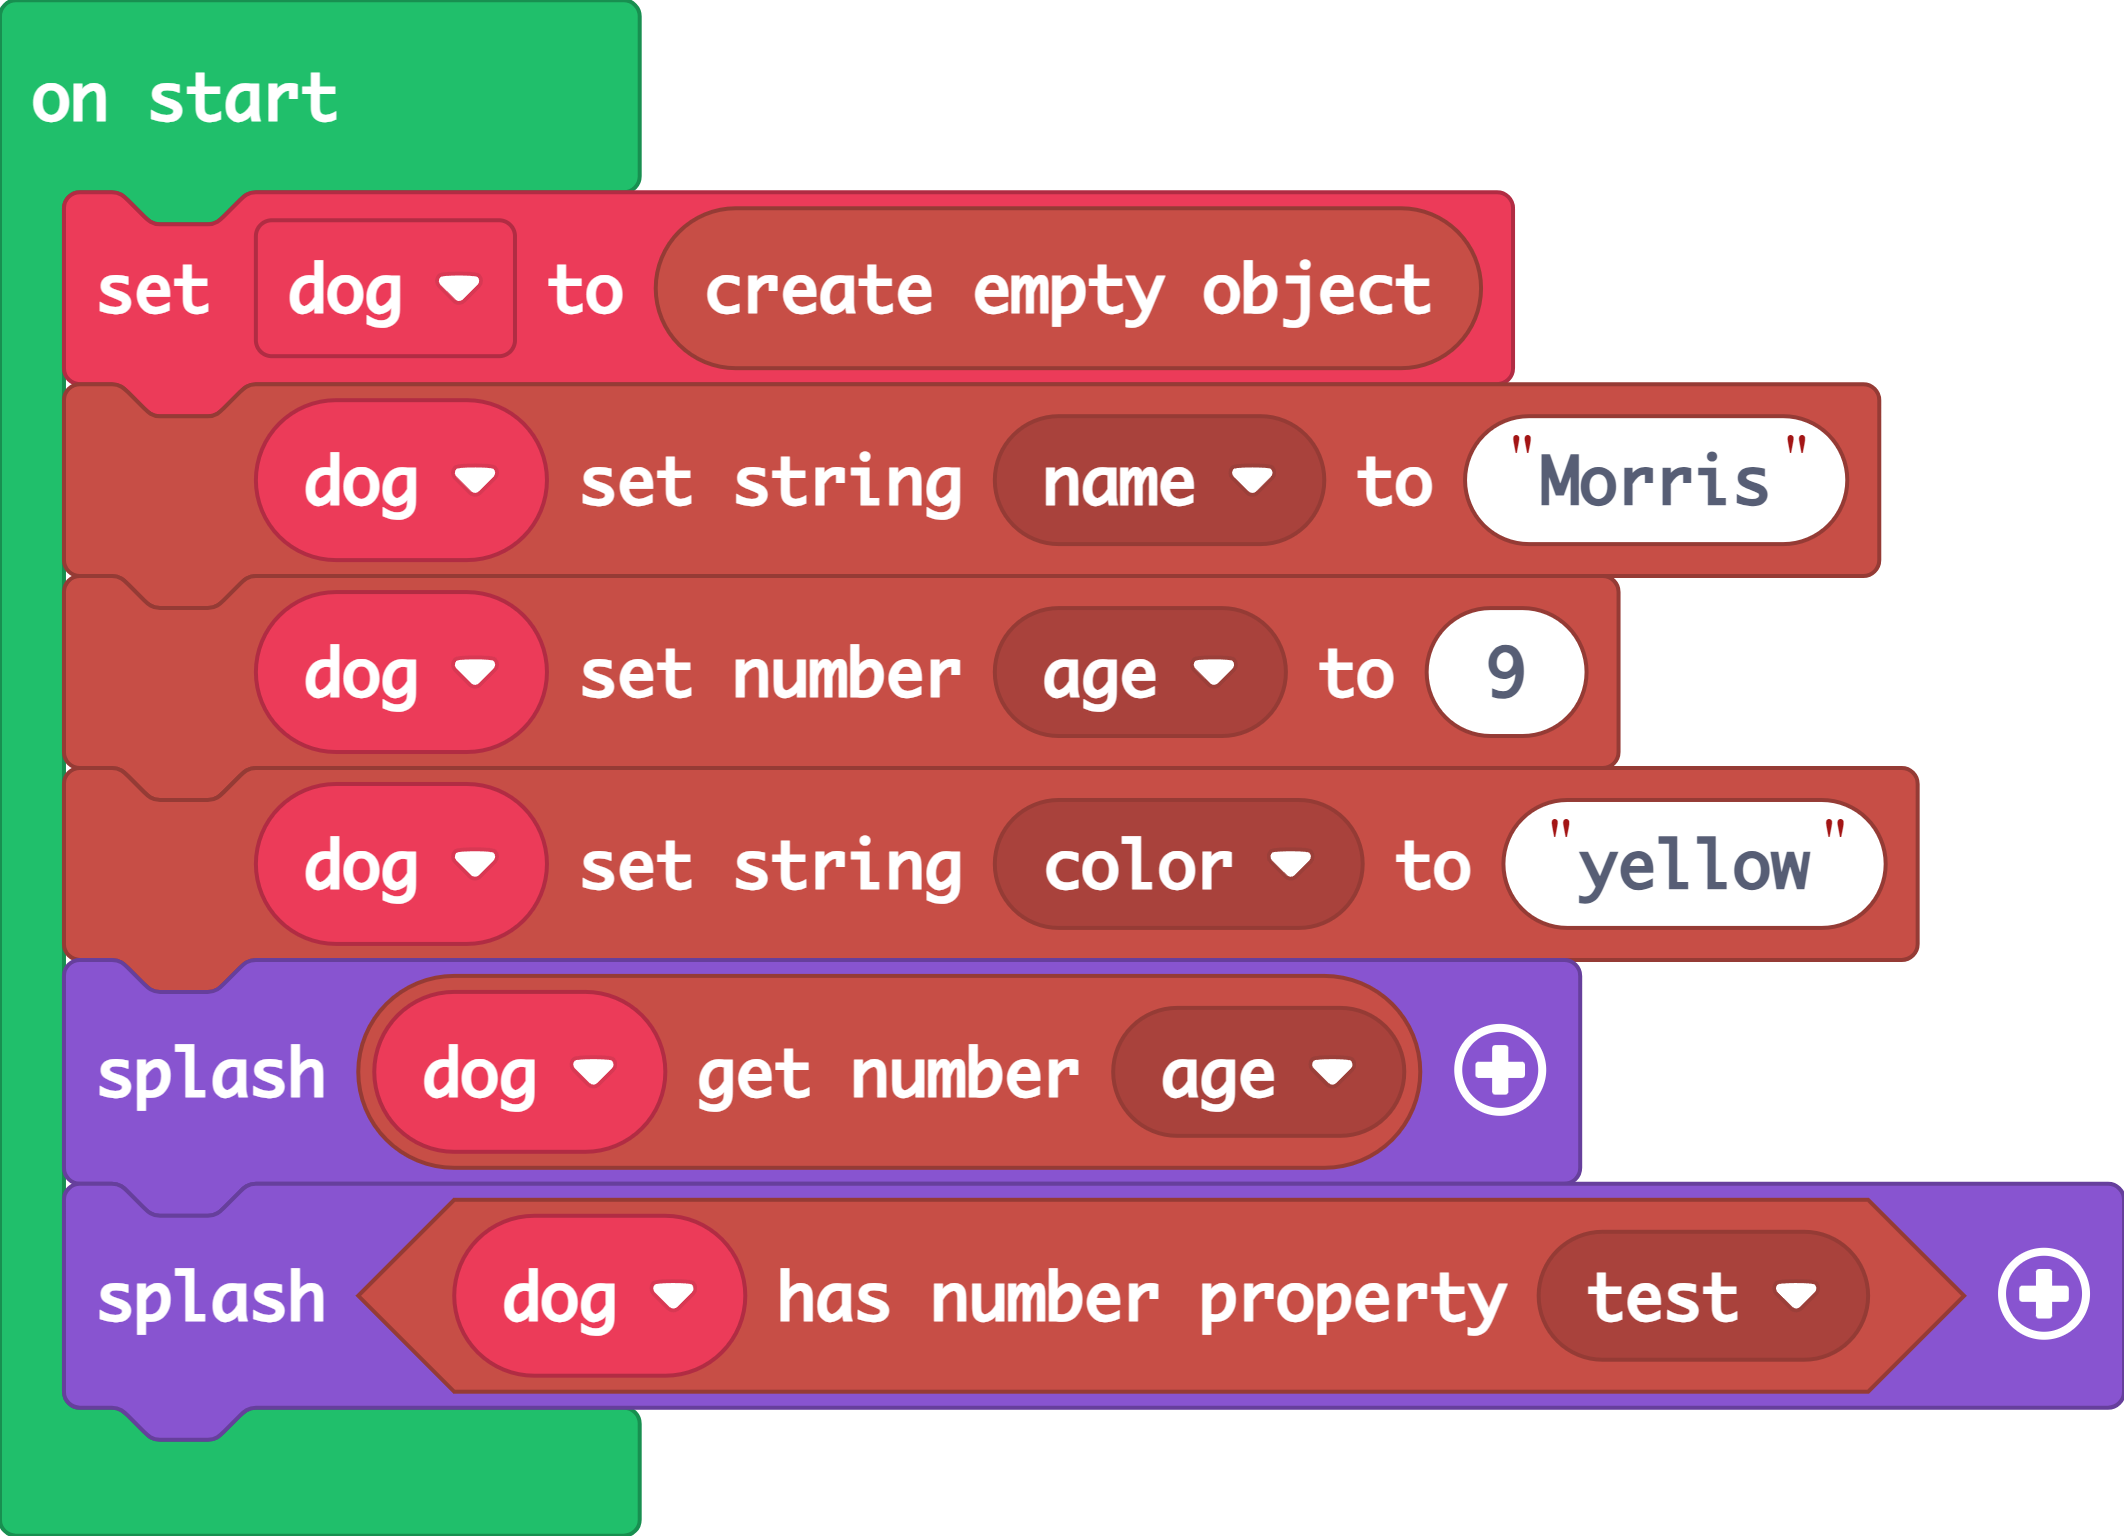
> The first splash block will output `9`, and the second one will output `undefined`. That doesn’t matter in a snippet like this, but in a big block of code it can cause some pretty nasty errors.
> 
> You can also check if a property has been assigned to an object with a block in order to avoid this.
> 
> ![arcade-screenshot (5)](https://us1.discourse-cdn.com/flex020/uploads/makecode/original/2X/4/4277f983095b200def73fd4f6d3cfa46b47472b9.png)
> 
> This time, the second splash will output `false` because we haven’t assigned a value to the property “test”, so it doesn’t exist on this object yet.
> 
> You can also achieve this by getting a value and checking if it equals to `undefined`. However, you can’t do that in regular MakeCode (without @jwunderl’s [Sprite Util](https://github.com/jwunderl/arcade-sprite-util) extension) so this approach is just a lot more straight forward (and it’s built in!)
> 
> And that’s basically it! Thanks for reading this far, have a cookie 🍪

* * *

Here’s the link to the blockObject extension after you’ve covered the entire tutorial

> **[GitHub - microsoft/arcade-block-objects: An extension for MakeCode Arcade that adds...](https://github.com/microsoft/arcade-block-objects/)**
>
> An extension for MakeCode Arcade that adds JavaScript like objects

Thank you so much for making it through! And I’d like to take this opportunity to apologize for delaying this so much. I wanted to make it high quality but I got caught up in a lot of responsibilities and writing this post up slowed down majorly.

I personally think this tutorial is much cleaner and higher quality than the last one I made, but that was over a year ago at this point (That’s also when I renamed myself to Sarge!)

And, as an appropriate footnote, I’d like to make a sequel to

![image](https://us1.discourse-cdn.com/flex020/uploads/makecode/original/2X/f/f546642f3f86679f101f11fd325b1d964d6a586f.png)

I’m _very_ sorry mods 💀

---

<div class="post-metadata">

### Author: ![Luke](https://sea2.discourse-cdn.com/flex020/user_avatar/forum.makecode.com/luke/32/32519_2.png) [@Luke](https://forum.makecode.com/u/Luke)
#### Post date: [November 16, 2023, 9:21pm UTC](https://forum.makecode.com/t/tutorial-what-are-block-objects-and-how-to-use-them/24274/2 "2023-11-16T21:21:00Z")

</div>

Thanks for making this!

---

<div class="post-metadata">

### Author: ![ChimbroDaPro](https://sea2.discourse-cdn.com/flex020/user_avatar/forum.makecode.com/chimbrodapro/32/15852_2.png) [@ChimbroDaPro](https://forum.makecode.com/u/ChimbroDaPro)
#### Post date: [November 16, 2023, 9:28pm UTC](https://forum.makecode.com/t/tutorial-what-are-block-objects-and-how-to-use-them/24274/3 "2023-11-16T21:28:26Z")

</div>

> [@Sarge](#):
>
> ```auto
> let person = {
> name: "Sarge",
> isCool: true
> }
> 
> ```

```auto
isModest: false

```

---

<div class="post-metadata">

### Author: ![AbstractDesigner](https://sea2.discourse-cdn.com/flex020/user_avatar/forum.makecode.com/abstractdesigner/32/22531_2.png) [@AbstractDesigner](https://forum.makecode.com/u/AbstractDesigner)
#### Post date: [November 17, 2023, 6:33pm UTC](https://forum.makecode.com/t/tutorial-what-are-block-objects-and-how-to-use-them/24274/4 "2023-11-17T18:33:30Z")

</div>

How long did it take you to write all that?!

---

<div class="post-metadata">

### Author: ![Sarge](https://sea2.discourse-cdn.com/flex020/user_avatar/forum.makecode.com/sarge/32/19590_2.png) [@Sarge](https://forum.makecode.com/u/Sarge)
#### Post date: [November 17, 2023, 6:34pm UTC](https://forum.makecode.com/t/tutorial-what-are-block-objects-and-how-to-use-them/24274/5 "2023-11-17T18:34:38Z")

</div>

A month or so because I did it in small sessions.  
Also I procrastinate a lot

---

<div class="post-metadata">

### Author: ![Luke](https://sea2.discourse-cdn.com/flex020/user_avatar/forum.makecode.com/luke/32/32519_2.png) [@Luke](https://forum.makecode.com/u/Luke)
#### Post date: [November 20, 2023, 6:57pm UTC](https://forum.makecode.com/t/tutorial-what-are-block-objects-and-how-to-use-them/24274/6 "2023-11-20T18:57:45Z")

</div>

I know you just finished this but I was thinking that a tutorial on making extensions could be really useful.

---

<div class="post-metadata">

### Author: ![Sarge](https://sea2.discourse-cdn.com/flex020/user_avatar/forum.makecode.com/sarge/32/19590_2.png) [@Sarge](https://forum.makecode.com/u/Sarge)
#### Post date: [November 20, 2023, 11:21pm UTC](https://forum.makecode.com/t/tutorial-what-are-block-objects-and-how-to-use-them/24274/7 "2023-11-20T23:21:05Z")

</div>

> **[Defining blocks](https://makecode.com/defining-blocks)**
>
> This section describes how to annotate your MakeCode APIs to expose them in the Block Editor.

Here you go.

Okay, okay, I’m just fooling around but that is a good idea! Well, you know how it is with my projects. See you all in 2024 🫠

---

<div class="post-metadata">

### Author: ![Matthew-diehl](https://sea2.discourse-cdn.com/flex020/user_avatar/forum.makecode.com/matthew-diehl/32/11947_2.png) [@Matthew-diehl](https://forum.makecode.com/u/Matthew-diehl)
#### Post date: [November 20, 2023, 11:21pm UTC](https://forum.makecode.com/t/tutorial-what-are-block-objects-and-how-to-use-them/24274/8 "2023-11-20T23:21:45Z")

</div>

Is there any way using this extension to make an array of objects?

---

<div class="post-metadata">

### Author: ![ChimbroDaPro](https://sea2.discourse-cdn.com/flex020/user_avatar/forum.makecode.com/chimbrodapro/32/15852_2.png) [@ChimbroDaPro](https://forum.makecode.com/u/ChimbroDaPro)
#### Post date: [November 20, 2023, 11:25pm UTC](https://forum.makecode.com/t/tutorial-what-are-block-objects-and-how-to-use-them/24274/9 "2023-11-20T23:25:43Z")

</div>

Oooooh YES PLEASE

---

<div class="post-metadata">

### Author: ![Matthew-diehl](https://sea2.discourse-cdn.com/flex020/user_avatar/forum.makecode.com/matthew-diehl/32/11947_2.png) [@Matthew-diehl](https://forum.makecode.com/u/Matthew-diehl)
#### Post date: [November 21, 2023, 6:02pm UTC](https://forum.makecode.com/t/tutorial-what-are-block-objects-and-how-to-use-them/24274/10 "2023-11-21T18:02:15Z")

</div>

Is there anyway to pass a blockObject as a parameter in a function as well?

---

<div class="post-metadata">

### Author: ![Matthew-diehl](https://sea2.discourse-cdn.com/flex020/user_avatar/forum.makecode.com/matthew-diehl/32/11947_2.png) [@Matthew-diehl](https://forum.makecode.com/u/Matthew-diehl)
#### Post date: [November 21, 2023, 6:04pm UTC](https://forum.makecode.com/t/tutorial-what-are-block-objects-and-how-to-use-them/24274/11 "2023-11-21T18:04:30Z")

</div>

To be clear I would like to use a nested Array of blockObjects. Basically a 4x4 2 dimensional Array of objects that would store information about rooms in a procedurally generated rogue like game. Info like the Tilemap, amount of enemies, if the room has been cleared yet or not, is there a chest. The issue is that everything about the rooms is determined on runtime, including which rooms are filled and which ones are empty. So even the Tilemaps will be changed when they are loaded to add doors where adjacent rooms are and such.

---

<div class="post-metadata">

### Author: ![Sarge](https://sea2.discourse-cdn.com/flex020/user_avatar/forum.makecode.com/sarge/32/19590_2.png) [@Sarge](https://forum.makecode.com/u/Sarge)
#### Post date: [November 22, 2023, 12:35am UTC](https://forum.makecode.com/t/tutorial-what-are-block-objects-and-how-to-use-them/24274/12 "2023-11-22T00:35:47Z")

</div>

> [@Matthew-diehl](#):
>
> Is there anyway to pass a blockObject as a parameter in a function as well?

Not _naturally_, but if you create a list argument and pass in a blockobject as the first element you can then get it in the function. That’s the theory at least, but I can’t get that to work, so I’ll say no. Maybe someonce can create a sample that works? @Vegz78 @Blobbey 👀

> [@Matthew-diehl](#):
>
> To be clear I would like to use a nested Array of blockObjects. Basically a 4x4 2 dimensional Array of objects that would store information about rooms in a procedurally generated rogue like game.

> [@Matthew-diehl](#):
>
> The issue is that everything about the rooms is determined on runtime, including which rooms are filled and which ones are empty.

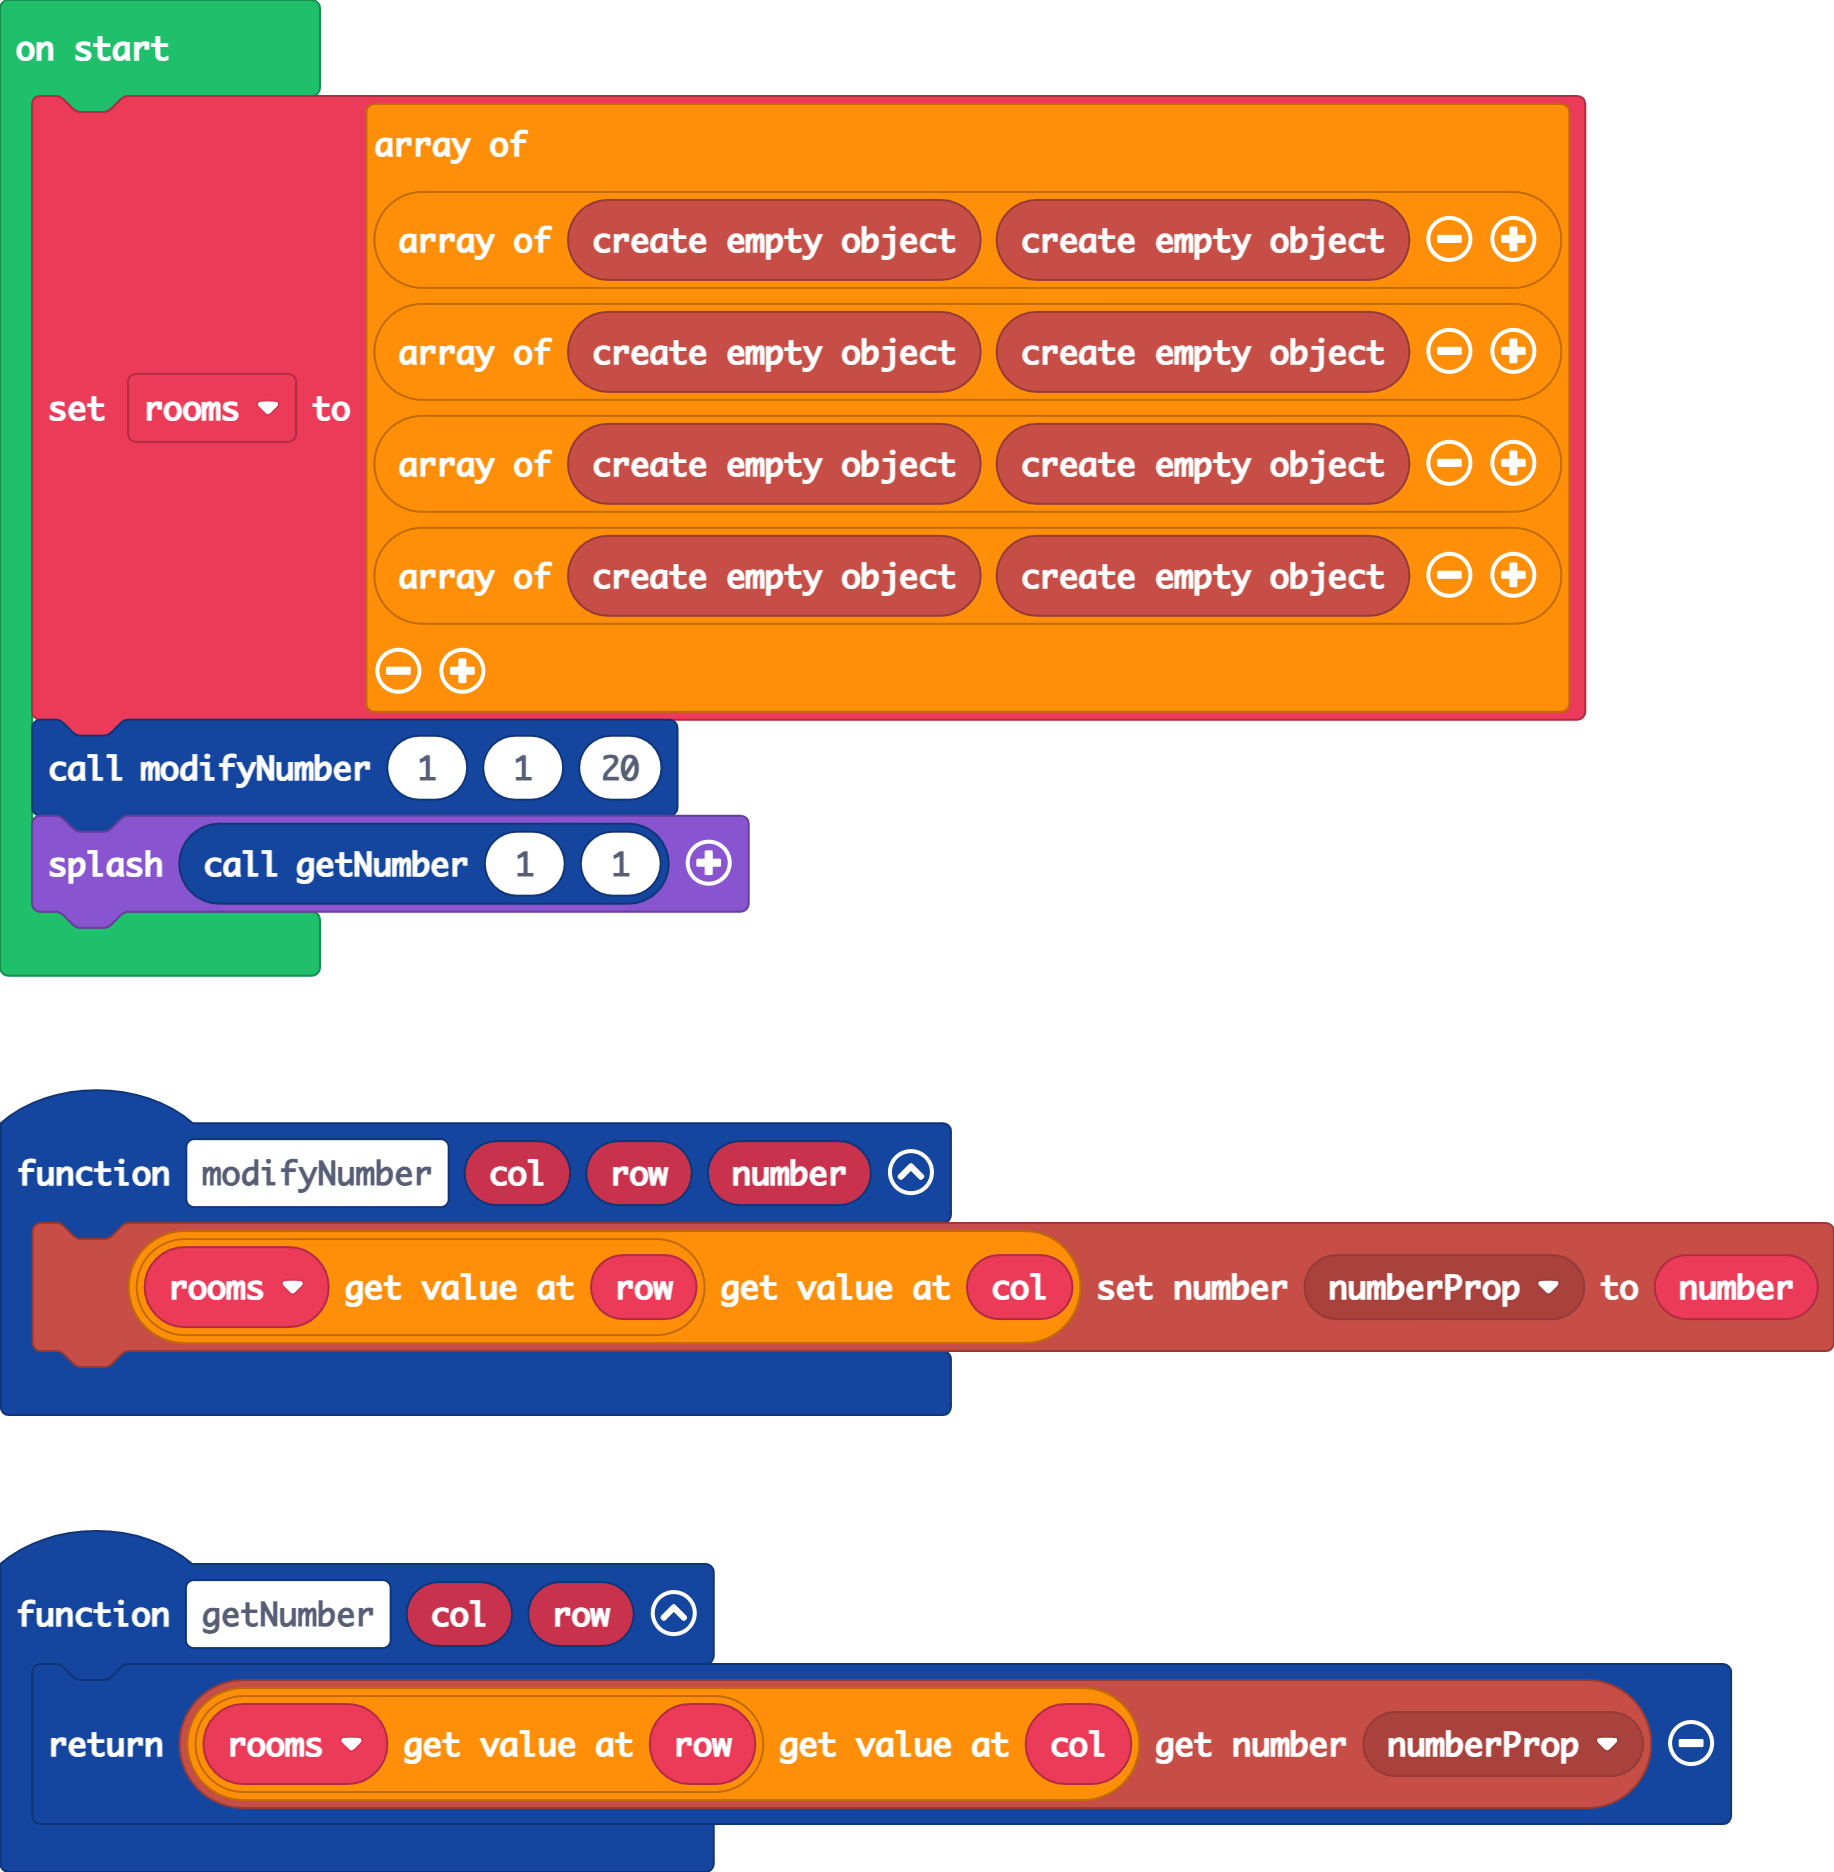
You can totally modify block objects on runtime, even if they’re in an array! Here I put together a little example of changing a number value in a nested block object, as well as retrieving it.
 ![arcade-screenshot](https://us1.discourse-cdn.com/flex020/uploads/makecode/original/2X/1/18de8c242117bf7fb5db4186af90fad4e89391ad.png)

In the start block, I just defined a nested array of empty objects. Basically, using the `modifyNumber` method I can pass in a row, column (x and y) and a numerical value. There, I get the object and set its value using the ususal set number block from the block objects.

You don’t have to do any additional work, the object is automatically updated because we referenced it directly in the array, and not a copy of it.

Then, we just get that value in the `getNumber` function. As you can see in the start block below the definition, I set the value at [1, 1] to 20, and then retrieve it with the `getNumber` function. The value we’ll get is 20 because we set it above. You can check this code out yourself here

> **[Nested objects](https://arcade.makecode.com/S09545-57615-79342-81580)**
>
> Made with ❤️ in Microsoft MakeCode Arcade.

---

<div class="post-metadata">

### Author: ![Matthew-diehl](https://sea2.discourse-cdn.com/flex020/user_avatar/forum.makecode.com/matthew-diehl/32/11947_2.png) [@Matthew-diehl](https://forum.makecode.com/u/Matthew-diehl)
#### Post date: [November 22, 2023, 8:06pm UTC](https://forum.makecode.com/t/tutorial-what-are-block-objects-and-how-to-use-them/24274/13 "2023-11-22T20:06:31Z")

</div>

Thank you so much. This is exactly what I needed, I was struggling to write it in Javascript. Besides your post I was unable to find any documentation on how the extension works.

---

<div class="post-metadata">

### Author: ![Sarge](https://sea2.discourse-cdn.com/flex020/user_avatar/forum.makecode.com/sarge/32/19590_2.png) [@Sarge](https://forum.makecode.com/u/Sarge)
#### Post date: [November 22, 2023, 8:34pm UTC](https://forum.makecode.com/t/tutorial-what-are-block-objects-and-how-to-use-them/24274/14 "2023-11-22T20:34:50Z")

</div>

It’s kind of messy, yeah. There’s little to none documentation about the extension and it’s quite unintuitive if I say so myself. I mean, it gets the job done, just not very well. Glad my response helped!

---

<div class="post-metadata">

### Author: ![Sarge](https://sea2.discourse-cdn.com/flex020/user_avatar/forum.makecode.com/sarge/32/19590_2.png) [@Sarge](https://forum.makecode.com/u/Sarge)
#### Post date: [November 22, 2023, 8:45pm UTC](https://forum.makecode.com/t/tutorial-what-are-block-objects-and-how-to-use-them/24274/16 "2023-11-22T20:45:00Z")

</div>

I can’t teach something I do not know myself 🥲

---

<div class="post-metadata">

### Author: ![TheEarth](https://sea2.discourse-cdn.com/flex020/user_avatar/forum.makecode.com/theearth/32/34579_2.png) [@TheEarth](https://forum.makecode.com/u/TheEarth)
#### Post date: [February 27, 2026, 11:39am UTC](https://forum.makecode.com/t/tutorial-what-are-block-objects-and-how-to-use-them/24274/17 "2026-02-27T11:39:59Z")

</div>

aged like milk also @sarge when will you do this pls speed I need this

---

<div class="post-metadata">

### Author: ![not\_a\_lemon](https://sea2.discourse-cdn.com/flex020/user_avatar/forum.makecode.com/not_a_lemon/32/35289_2.png) [@not\_a\_lemon](https://forum.makecode.com/u/not_a_lemon)
#### Post date: [February 27, 2026, 9:46pm UTC](https://forum.makecode.com/t/tutorial-what-are-block-objects-and-how-to-use-them/24274/18 "2026-02-27T21:46:40Z")

</div>

Bud this was from 2023 and @Sarge hasn’t been online for a while

---

<div class="post-metadata">

### Author: ![Sarge](https://sea2.discourse-cdn.com/flex020/user_avatar/forum.makecode.com/sarge/32/19590_2.png) [@Sarge](https://forum.makecode.com/u/Sarge)
#### Post date: [March 2, 2026, 2:22am UTC](https://forum.makecode.com/t/tutorial-what-are-block-objects-and-how-to-use-them/24274/19 "2026-03-02T02:22:38Z")

</div>

Yeah I have  
I’ll consider

---

<div class="post-metadata">

### Author: ![TheEarth](https://sea2.discourse-cdn.com/flex020/user_avatar/forum.makecode.com/theearth/32/34579_2.png) [@TheEarth](https://forum.makecode.com/u/TheEarth)
#### Post date: [March 2, 2026, 5:48pm UTC](https://forum.makecode.com/t/tutorial-what-are-block-objects-and-how-to-use-them/24274/20 "2026-03-02T17:48:43Z")

</div>

lol, no he came back so I requested this from him since he’s back

---

<div class="post-metadata">

### Author: ![ScriptScraper](https://sea2.discourse-cdn.com/flex020/user_avatar/forum.makecode.com/scriptscraper/32/35438_2.png) [@ScriptScraper](https://forum.makecode.com/u/ScriptScraper)
#### Post date: [September 7, 2026, 7:56pm UTC](https://forum.makecode.com/t/tutorial-what-are-block-objects-and-how-to-use-them/24274/21 "2026-09-07T19:56:52Z")

</div>

This was so helpful! I’m currently trying to switch over the javascript

[Next page](https://forum.makecode.com/t/tutorial-what-are-block-objects-and-how-to-use-them/24274.md?page=2)
