Hey folks!
It’s times for the second edition of Richard’s Arcade Tips! First off, I want to mention that I have created a new tag for this series of posts. If you’re interested in seeing all the entries, you can check out the page for the arcade-tips tag!
With that out of the way, let’s move on to today’s topic!
Programmatically drawing to images
Sprites are nice, but sometimes you want to draw directly to the screen. This can be tricky to do in Arcade, so I’m going to show off a few methods for doing this as well as some example programs that demonstrate why it’s useful. Let’s dive in!
Technique #1: Drawing to the background image
This is the easiest way to get something on the screen. Inside the “Scene” category, you will find a “background image” block. You can draw to this just like any other image using the blocks in the Image category.
For example, this code:

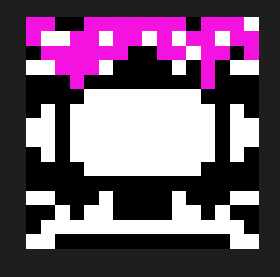
Draws this dumb picture of a grinning box:
Hurrah.
While this approach is easy to use, it has a major drawback in that it will always be drawn below everything else. The background image is essentially at a z-index of -Infinity, so it can never be above any Sprites in your game (or the tilemap for that matter). Because of this limitation, I never really use this approach for doing anything beyond little algorithmic drawing demos.
Let’s look at something more practical!
Technique #2: Use a Sprite
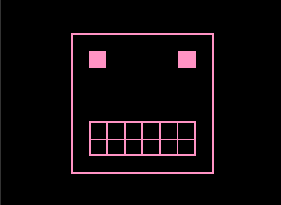
This approach is a little clunky to use, but it gets the job done! The idea here is to create a Sprite with a transparent image and draw to that image as if it were the screen. For example, let’s take our above example and use it to make a Sprite:

Now if we were to run that code, we get the same result as our original example:
However, the nice thing about this approach is that because you’re creating a Sprite, you can do Sprite things with it like controlling it’s z-index or making it bounce around:

This makes this a good choice if you want to programmatically draw anything that should be subject to the physics engine. For example, this is how I created the player character in Rhombus Rush.
The downside of this approach is that because you’re creating an empty image for the sprite, you’re taking up extra memory for your game. For small sprites that won’t really matter, but if you’re creating a bunch of bigger sprites then you might get some out-of-memory errors on hardware. This is only really an issue on hardware (the browser doesn’t have memory issues).
Technique #3: Use the jwunderl/arcade-sprite-util extension
This third technique requires an extension, but it’s way more powerful than the first two.
Inside @jwunderl’s wonderful arcade-sprite-util extension there is a “render on z-index” block:

The “screen” parameter that you see in that block is a reference to the game screen. You can draw to it just like any other image and the z-index argument lets you control when the draw happens.
The benefit to this approach is that the screen is automatically cleared every frame of the game so you don’t need to worry about erasing things you already drew. Additionally, because this is called as part of the game render step, the screen will also have the pixels of everything below the given z-index already present when your code is invoked. That means you can do fun things like messing with the pixels on the screen (more on that below).
However, be aware that if you want to do anything with this block that is affected by the game camera, you’re going to have to do a little extra math to make it work (see the last example for tips on this)
Alright, with that out of the way, let’s take a look at some examples!
Example #1: Drawing fractals
The background image technique is only really useful for doing classic programmatic drawing examples like drawing fractals, so here’s one of those! Marvel at the symmetry!
Example #2: Screen effects
As mentioned above, one of the benefits of using the “render on z-index” block is that because your drawing code executes as part of the game loop’s render step, you can mess with the screen’s pixels in addition to drawing new things. That means you can do cool full screen effects!
To show this off, let’s create this effect which remaps the colors of part of the screen:

First, we’re going to create a function that takes in an image and changes the colors inside a rectangle:

To change all the pixels in the rectangle, we can use a couple of for-loops to loop over all of the xy coordinates:

(note: to change the variable in a for-index loop, create a new variable with the name you want and then right click on the variable in the loop and select the variable you created)
Inside that loop, we want to read the old color from our image and then remap it to a new color. To choose our new color, we’re just going to add 1 to whatever the old color was:

And finally, let’s call our function inside the “render on z-index” block:

Here’s the finished code:
This example is a really simplified version of the technique used by the shader and lantern extensions!
Example #3: Screen effects with z-index
Now, let’s say we have an effect that we want to apply to the background but not the sprites in our game. We can control which sprites are affected by our effect by using the z-index.
Let’s start with this heat wave effect:

In arcade, higher z-indices are drawn on top of lower z-indices. For screen effects, that means that all sprites with a lower z-index will be affected by the effect while sprites with a higher z-index wont.
In the GIF below, we have three “sprites”
- The house, which has a z-index of 49
- The heat wave effect, which has a z-index of 50
- The duck, which has a z-index of 51

Because the duck has a higher z-index, it isn’t subject to our wavy effect. The house’s z is lower, so it is affected.
Here’s a link to that code:
And here are some other useful z-indices to know about:
- Background images are always drawn first (
z = -Infinity) - Tilemaps are drawn at
z = -1 - The default z-index for sprites is
z = 0 - The HUD from the info category (scores, lives, countdown, etc.) is drawn at
z = 100
Example #4: Respecting the camera
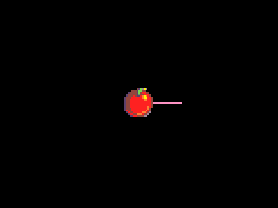
The “render on z-index” block is also super useful for drawing custom UI. For example, let’s say I have a game where I want to draw a line showing which direction a sprite is facing. This is super easy to do with “render on z-index” and a little trigonometry:

And here’s what that code looks like when it runs. Note the line that is showing the direction the apple is moving:
This works well for our little example game that doesn’t use the camera, but let’s say I add a tilemap to the game and have the camera follow the duck. Now we get this:

As soon as the camera starts scrolling, the line stops being drawn where the apple is.
To fix this issue, we need to take into account the current camera position. When you want to draw something to the screen that is affected by the camera, always subtract camera left from the x coordinates and camera top from the y coordinates.
Here’s what our adjusted render block looks like:

And here’s the finished code: