so I was wondering about the make code extensions I have created a couple extensions and I was wondering I’ve seen some of the default extensions have images on them when you go to download them but every time I try to add that to a extension that I make it doesn’t work is that possible?
1 Like
to have a thumbnail image, it needs to be an approved extension. see this page for instructions on the requirements. once you’ve met the criteria, you can open a pr in https://github.com/microsoft/pxt-arcade/ that adds your extension to targetconfig.json
2 Likes
Could you please explain it a little more simple, please
Short version: In general, no, it is not possible. Not by yourself, anyway.
Longer version: Richard gave you two steps, the first of which is that the extension needs to meet the requirements of an approved extension. That’s the first link.
Once you’ve met the requirements in the first link, you need to make a pull request against the official MakeCode Arcade code. Get the first step done. Then let us know, and we can help you with the pull request.
1 Like
Still kind of confusing for me I mean, I kind of understand some of the things on the first link I mean, I think one of them was poor. Like give a release date or something and get hub and I think that should be already done at a test file which I think is easy but
1 Like
And then like add a license file, I don’t know what that means or is
1 Like
That explanation website is very, very outdated!
Most of this stuff can be done in Makecode with a few button presses, and those instructions on that website were made before you could do that, so here are instructions on how to do it with modern Makecode features!
The only reason I haven’t got my own extensions on the main page is because you need API documentation, which is really, really annoying (in my opinion). Basically, API docs are the explanations that pop up when you left click a block and use the “help” option, which I’m too lazy to make for my own extensions. Anyways, here’s the explanation:
First, you must “create a release”. This is a normal step when creating any extension, and is pretty easy in makecode.
First, you must have your GitHub account linked to your Makecode account, which I forget how to do. I tried signing out of Makecode and it was still linked to my GitHub, even signed out, and I can’t remember how I linked it the first time, sorry. Maybe there will be a popup while you follow these steps? Who knows.
Publishing your extension:
Once you have your extension all made, preferably in its own .ts file and with its own namespace, you can create a GitHub repo for your project by clicking this button:

Then you can name your extension and add a short description:

After that, your repo will be created and you’ll see this icon at the bottom of your project next to the name:

Click on that and you’ll be brought to this menu page, where you can click the “Create Release” button:

Use the default option of “0.0.1” and click “Create Release”:

Once that’s done, find the “Add License” button:

Clicking that will bring you to the GitHub repo, where you can review and add the MIT License:
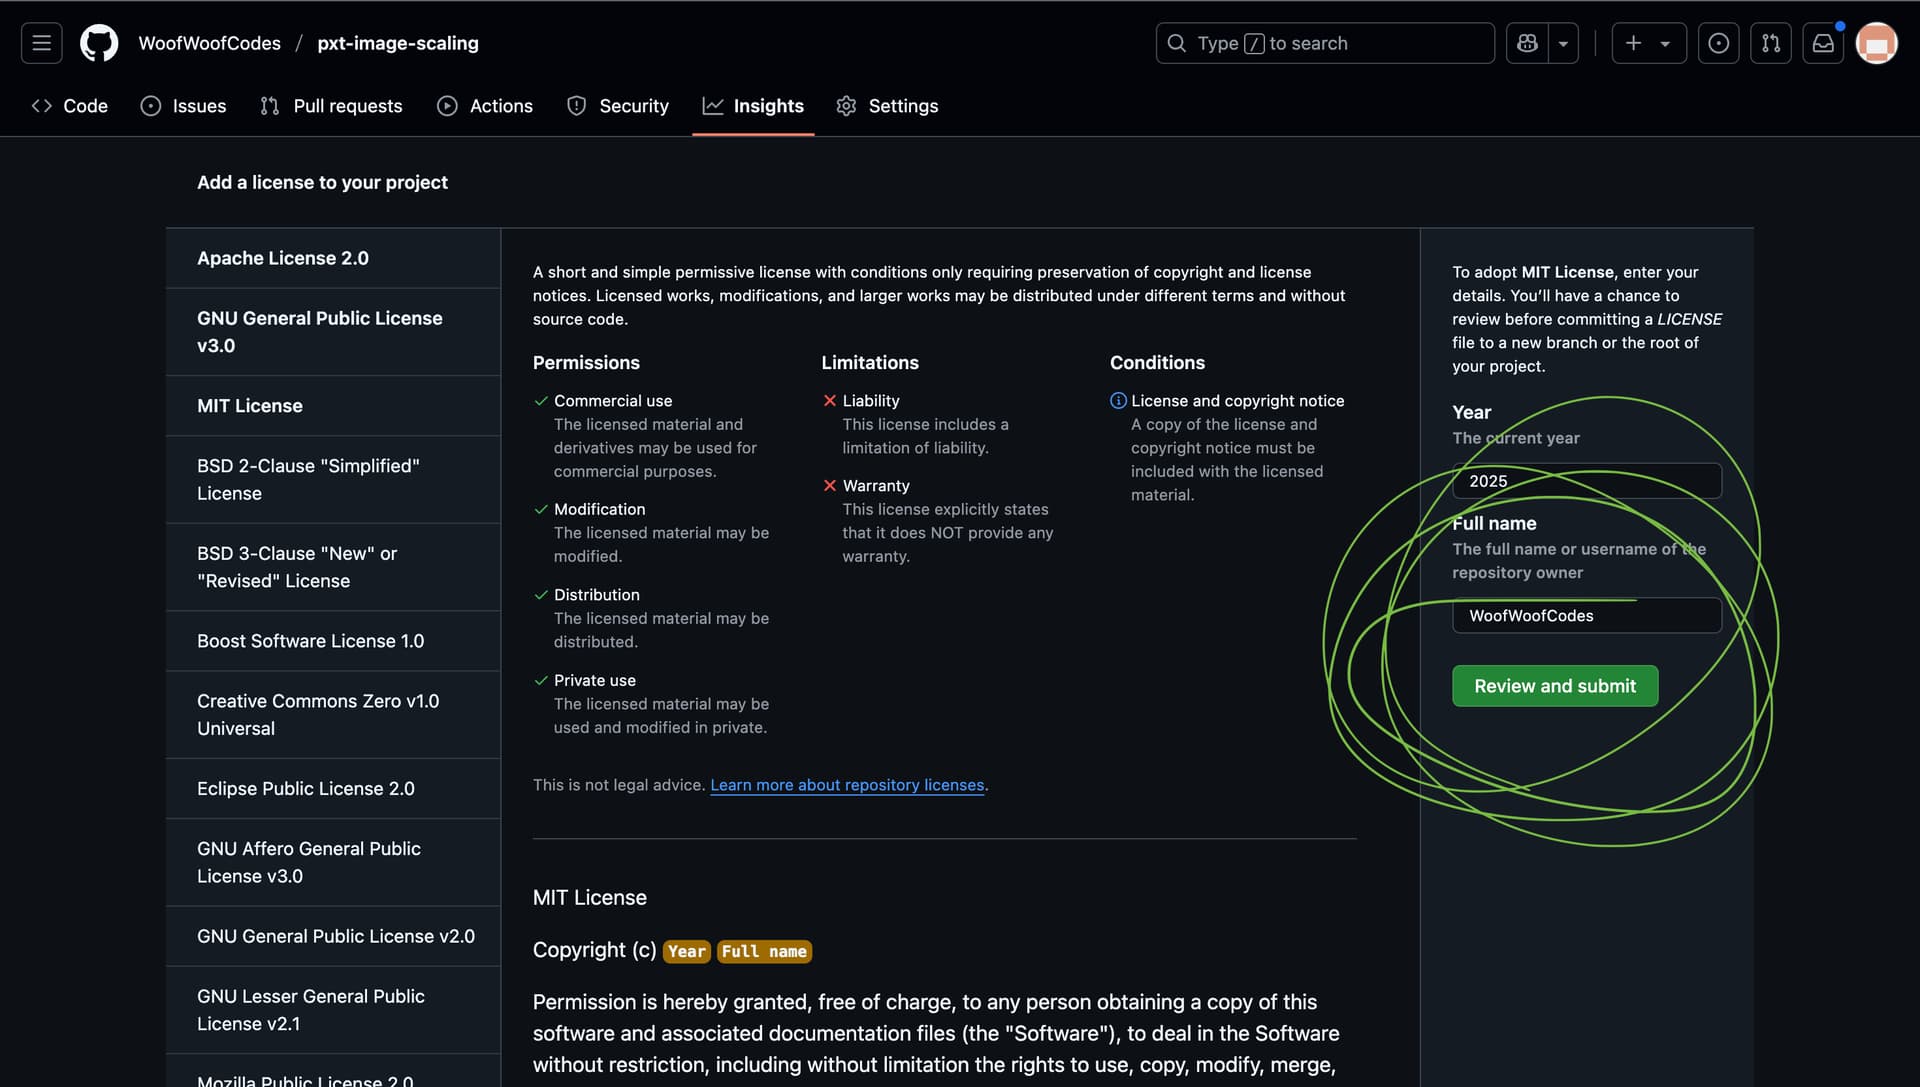
And then commit your changes:

After that you should click the “pull changes” button so your makecode project is up to date with your GitHub Repo:

If you look at your repo, you’ll see that a test.ts file has been automatically created for you, so you don’t need to worry about that. You must remember that every time you make changes to your extension, you must create a new release, or the changes won’t apply to the version that Makecode downloads when you add the extension to a project. Preferably, follow those guidelines about which number to increase with each release. It should be in the format Major Release : Minor Release : Patch.
One important thing: if you have tilemap.ts files and such that you don’t want downloaded when someone adds your extension (such tilemap files will actually create errors if they are downloaded!), you can prevent them from downloading by clicking on the pxt.json file, clicking “edit settings as text”, and either deleting those files from that “files list” or moving all those files into the “test files” section. That way, they will not break peoples’ projects when they add your extension!!


remember to create a new release after making all these changes!
This is where you would stop if you just want a normal extension, but let’s keep going to fill out the rest of the steps needed to get your extension approved and in the main extensions list!
Now, you also need to add an image in an “icon.png” file to your repo. I am pretty sure you can just take a screenshot of whatever you want and add it to your GitHub repo. Looking at those instructions, it says it should be 300x200 pixels, and less than 100kb, but looking at some other icons, like the one from riknoll/arcade-tile-util Richard obviously didn’t follow this rule exactly, so it’s probably fine if you don’t either (Yes, Riknoll is Richard’s GitHub account!). Just try to make your image about a 3:2 ratio in size and less than 100kb. For my example, I’ll be adding this screenshot I made of me using my extension, which is probably a good way to do it:

I actually had no idea how to do this before looking into it!
First I took the screenshot. I looked at the file info to make sure it was under 100kb, and it was only 46kb, perfect!
Then I made sure to rename the screenshot file to “icon.png”.
I went onto my github repo and found the “Add File” button:

I clicked “upload file” and simply added the “icon.png” file to my repo!
The last thing you have to do is create API documentation in your READ ME file. I don’t enjoy even the idea of doing this. It sounds boring and it’s really way too much effort, considering I don’t really care about having my extensions on the main extensions list. If you want a good example for how to do API docs, you can once again look at riknoll/arcade-tile-util. If you look into the READ ME file, you’ll see how and… wait a minute… there’s no API docs here! It seems that some people (Mods obviously) can just add their extensions to the list without getting them approved first, so they don’t have to make API docs! (@Richard how could you!)
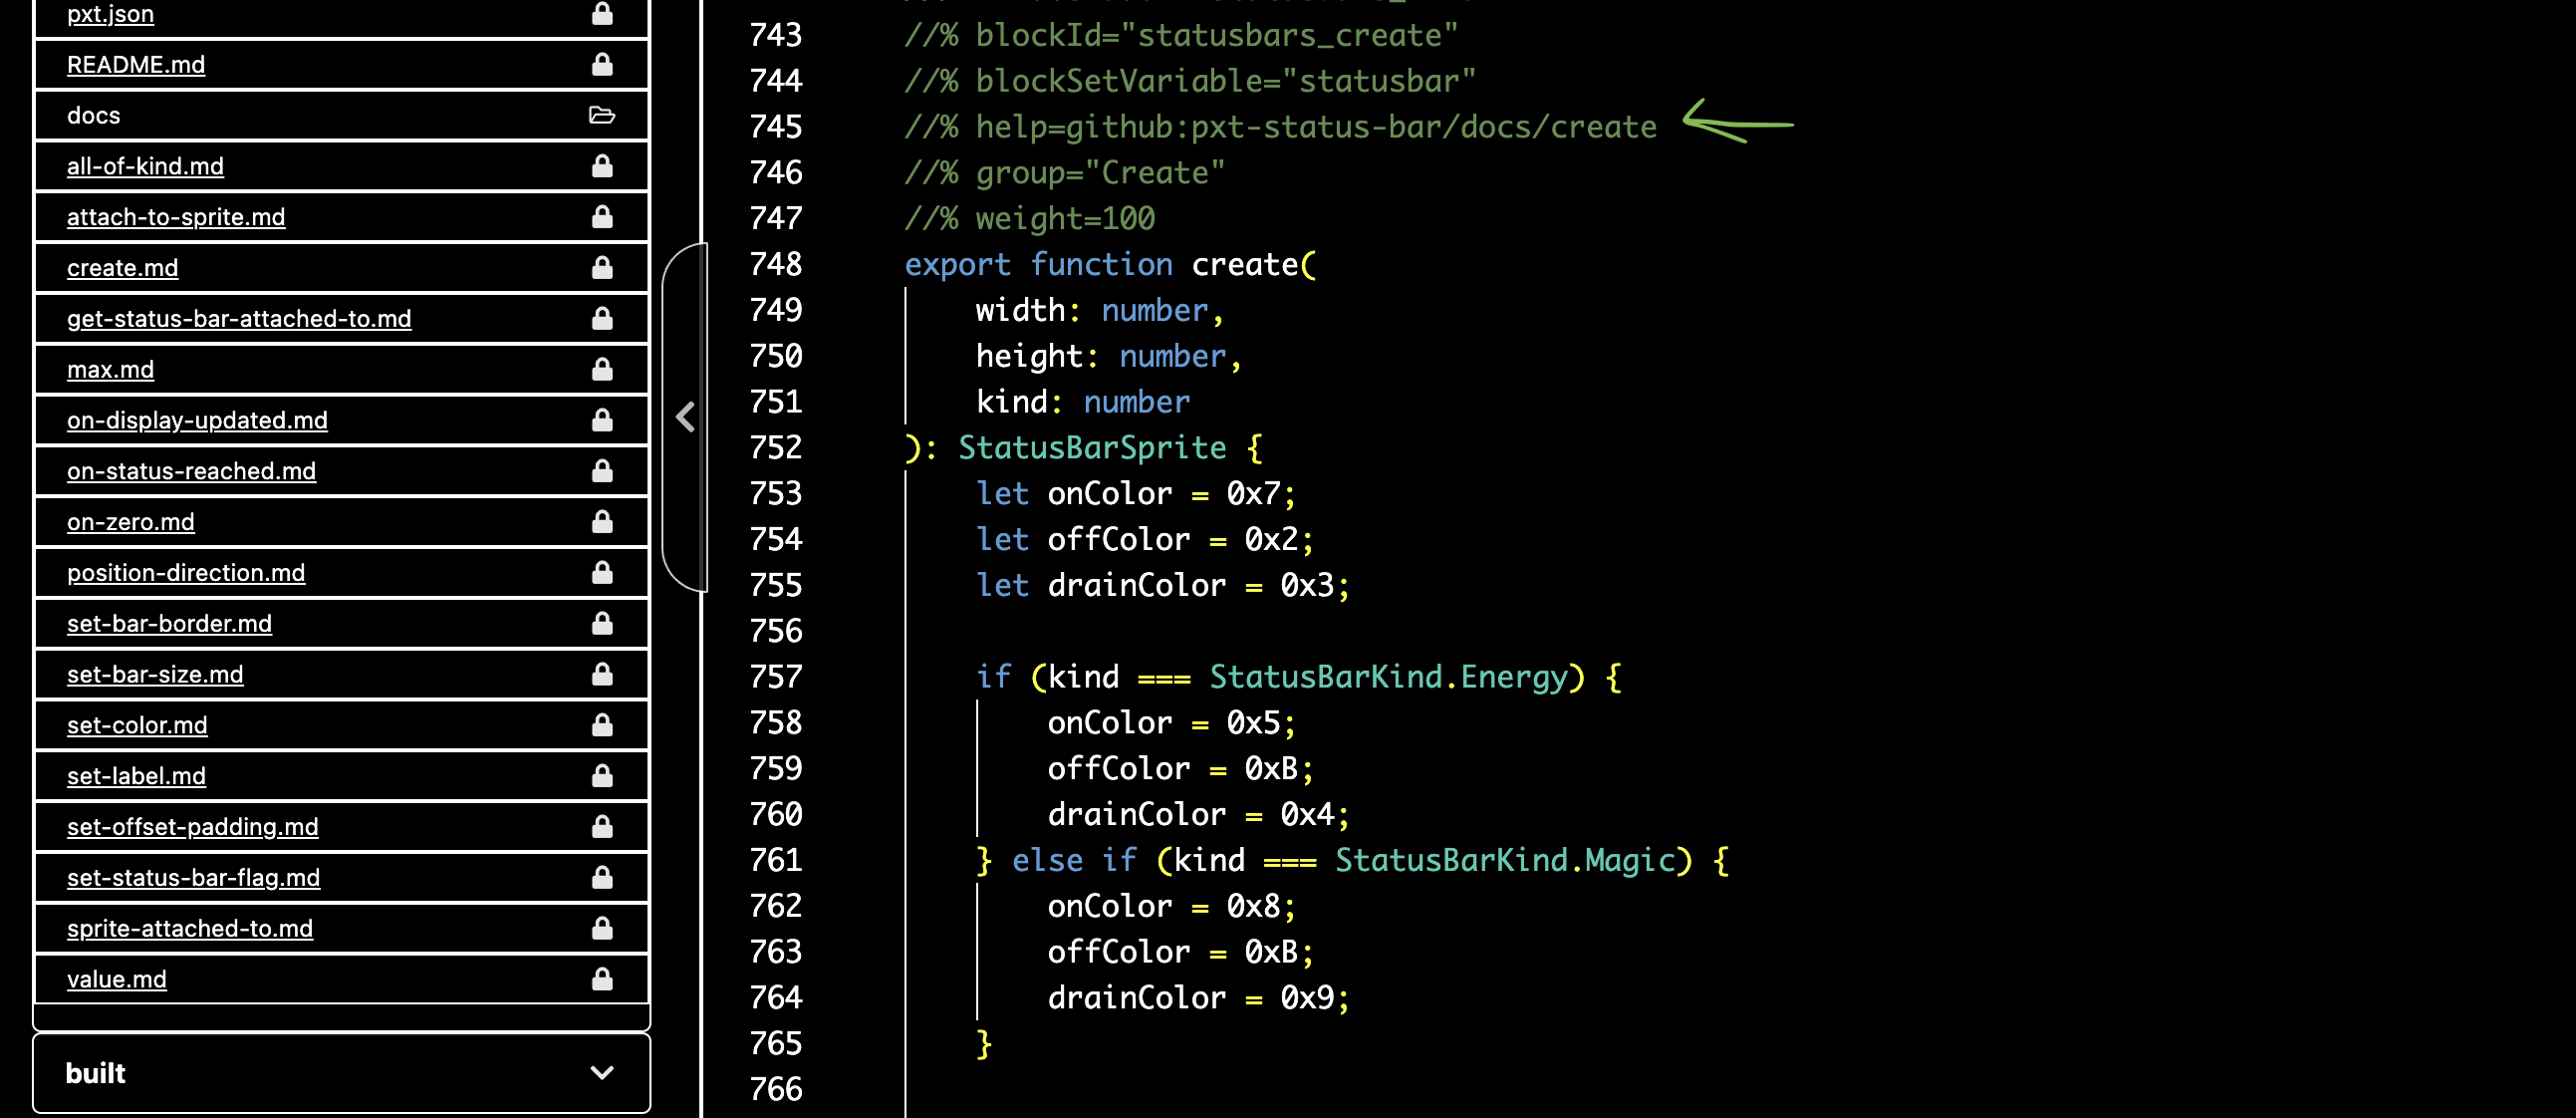
Anyways, if you want to see some actual API docs, you can look at jwunderl/pxt-status-bar which has really extensive documentation that’s amazing and wonderful! (Thanks @jwunderl!)
I guess I should also point out these block definition lines that point to the docs and make that help button work correctly:
Then the last thing is to return here and post the link to your GitHub repo so that someone can help you make a pull request (After creating yet another release to make all these changes apply!). This is basically a formal request to change a bit of code in someone else’s github repo. In this case, you (or someone else) will be making a request to add your extension to the list of “approved repos” in this file of the pxt-arcade repo:
(At least I’m fairly certain this is what you do. I’ve never done it before!)
This is a super long explanation, so I’ll probably link to it whenever someone else wants to know how to publish their extension. This is probably the longest forum post I’ve ever made!
7 Likes
approvedRepos in pxtarget is actually deprecated / just back support for old versions, ‘approvedRepoLib’ is the field we replaced it with that supports tags listing / few other things.
tbh wonder if copilot along with the vscode-makecode extension might be easiest way to just burn through stubbing out documentation for extensions for now, i need to go find it but i had a pretty solid .prompt.md file i experimented with that helped vscode’s coilot know how to understand static typescript / would be solid as base for generating docs.
4 Likes
Amazing guide!
1 Like
I think I did everything right I did everything and then I don’t know if I have to redo the read me file. I just kind of left it the way it is. I don’t know. I don’t know if I have to do that block preview thing or anything, but also do I I know you I put that there’s a fire with an icon in might get hub but do I have to put like a link in like the adjacent file that says icon equals and then has the icon or how does that work?
1 Like
So I think I did everything right I mean, I don’t know if I have the icon file in my GitHub report. I have the help statements at the top. I just need help to pull it or something or I don’t know. I don’t know exactly what to do but just to be clear on what extension I’m trying to do this with. I’m trying to do this with the vital icons extension
1 Like
Holy effortpost, I’m saving this ![]()
5 Likes
it’s on my todo list to make a video on making an extension from scratch… maybe one day i’ll just hijack stream and we’ll do that instead and then i’ll edit it down into something shorter
2 Likes
Yes please! Right now there are so many different places you have to go to find info/give other people info, and many are outdated. A single YouTube link would make our lives so much easier!
Said that I do everything right like can you answer the questions please?
1 Like
Also, I don’t know if this helps but I made a small book on Google Docs on how to make an extension if you guys want I can post it on here
2 Likes
I don’t know if it’s perfect, but it definitely explains a little bit of stuff. I mean I showed it. I gave it to my friend and he said that it helped him a little.
1 Like
Oh! I thought you hadn’t posted the link to your repo yet, but I found it in your other topic with the list of extensions, so I’ll look at it now!
- Don’t post Google Docs here because then people can find your email and send you stuff or put your email on a spam list and that is very very annoying.
- Looking in your github repo, there is Pull Request waiting. That just means that something was weird with your request and you need to go into it and make sure everything is correct before approving the request. This cannot be done in Makecode and must be done in GitHub
- Your icon.png is name “icon.png.png” so you’ll have to use GitHub to change that:
Click on the file…
Click that pencil edit icon…
And correct the name.
Then click the green “commit changes” button and it will be corrected.
Idk what the warning means, but it’s probably fine. I took the screenshot on my Mac, so maybe it’s a weird file type.


The last thing is the API docs in the READ ME file. The stuff already there is default extension info, so you’ll need to add some stuff. The thing is, I’ve never done that step, so I can’t really help with it. I can suggest another example though, so here is Richard’s arcade-character-animations extension: https://github.com/riknoll/arcade-character-animations/tree/main
if you look in the “docs” folder at the top, you’ll see a bunch of .md files. Click on one and switch from the “preview” view to the “code” view and look at how all those interesting text and block example effects are created.

I think you have to create these files in GitHub, not using Makecode.
1 Like