Lanterns: improving the Multilights extension!

You can import my version by searching “WoofWoofCodes/lanterns”
in the extensions search bar!

Demo:

Credit where credit is due:

The original single-light-source version, @richard’s lantern extension, can be found here and the extension that I modified, @felixtsu’s Multilights extension, can be found here!

Thank you both for your work on this!!!

(I hadn’t used GitHub before this project, so mine isn’t a fork of Multilights like Multilights is a fork of lantern, sorry.)

Why?

As I said here I really want to get into making extensions and what better way than to start by editing one!? I picked this one because of this post from @Luke about how the Multilights extension was not really complete. I thought it might be an easy fix (lol it was, it was just hard to find).

Added features
  • added options for controlling the shiver effect of light sources
  • added the ability to change the center radius of a circle light source
  • added the ability to change which light level a flashlight is at (full bright is darkness 0)
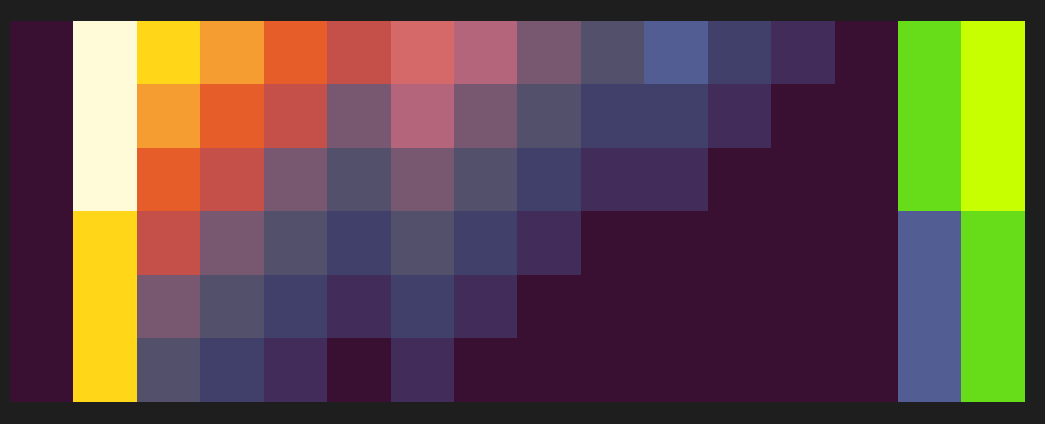
  • added the ability to change the “Shader Ramp” image (idk what else to call it) (explanation coming soon. Check the comments!)
Bug fixes
  • fixed the issue Luke was talking about with the missing light bands
  • fixed weird missing lines in flashlight and circle light (really there were like 4 separate bugs doing that lol) (floating point imprecision is so annoying!)
Bugs that aren’t squashed yet

There are probably going to be many bugs that happen when setting values too large or in the negative. For the most part I won’t fix these because… well… just don’t set the values like that and you’ll be fine.

Here are just a few I know about:

  • making a flashlight angle range above 90 results in… more interesting effects the higher you go (I don’t think I’m gonna fix this one, sorry!)
  • negative flashlight darkness levels error
  • negative circle center radius errors once (I think) the band width + the center radius is less than 0 (or equal to it? I haven’t done a lot of testing)
set Shader Ramp explanation??

If I haven’t made an explanation for how the “set Shader Ramp” block works yet, you can try to look in the demo project and see what it’s doing. Just keep in mind the dimensions of that image if you are making your own, and also read what the comment on that block says.

reporting bugs

If you find bugs, please report them! If it’s something you can recreate, please comment with the simplest project you can make that recreates the bug. This makes it much easier to tell what exactly is causing it. If you can’t recreate the bug, sending a screenshot with an explanation and (preferably) your project code is fine.

Anyways, have fun with this!! The are definitely more than just darkness effects possible if you know what you’re doing. I look forward to seeing them!! Off the top of my head there’s a very cool shockwave effect that I’m planning on using in the future…

11 Likes

So this is really cool!!!
What else can we do with this?

2 Likes

thank you sm!!!

3 Likes

Just noticed that there is no “remove flashlight from (sprite)” block, so I will have that added soon, most likely by tomorrow! The original Multilights extension is also missing that! :laughing:

3 Likes

Awesome extension! Something I didn’t know I needed but now I’m definitely using it! Maybe in an upcoming project.

1 Like

Awesome!!

But what is this :eyes:

1 Like

Done! I also fixed issues with the flashlight and circle light sometimes not disappearing after the sprite is destroyed.

2 Likes

Very nice!

3 Likes

set Shader Ramp explained!

Ok, here it is, the shader ramp explanation. This is gonna be a long one!

TLDR: the block lets you set which colors turn into which other colors at each light level.

you might want to sit down for this one

Ok, so, basically, this image is used to tell the shader which colors become which other colors at each light level. The image should be 16 x 6, though other sizes won’t really break anything.

important note to remember: the first row in the image, the top one, is not used for anything. It is only there so that you can place all the colors in order, at the top, which makes editing it much easier

If you look inside the demo project, you’ll see a version of the image that’s very close to what the normal, default version looks like, just with some extra dark grey pixels under yellow.
As you might have noticed if you looked at the simulator, this makes all the yellow pixels visible as dark grey, even in pitch black, outside of any light.

This works because the 6th row of the image is used to shade what I’ll call “dark level 5”.
I’m going to call it that because the “darkness” level attribute that you can use on flashlight sources goes from 0 (fully bright) to 5 (full dark. Don’t use this though, it just makes your game more laggy for no reason)

If this is confusing, just pretend the first row doesn’t exist (because it really doesn’t) or think of it like arrays, with 0, the start, being no darkness at all.

Essentially, each row of the image is a different dark level, and each column represents a color.

The first column, on the left, represents color 0, which is clear, and the last column is color 15 (black) (this explains the image width of 16). For reference, colors in the image editor color picker are ordered right to left, top to bottom, and you can hover over them to see exactly what number they are.
Any “clear” in the image will show up as the color black, which is why there isn’t any black in the demo image: it isn’t needed.

If, for example, you wanted to make the color outside of the light something other than black, you would have to replace every clear pixel in the image with that color, so that every time it would be black, it’s your color instead!

That’s basically the whole explanation. One other thing is that, due to the way Richard coded it, and because I didn’t think it needed changing, there is an extra, unused row: dark level 4, which can only be used by a flashlight with darkness level 4. I wouldn’t be surprised if someone found a really cool use for that, so I’ll leave it in!

2 Likes

Woahh, that’s so cool! So you could theoretically just make it any color ramp you wanted, like a light fog or a hue shift!

2 Likes

holy! this is amazing! I could use this 100% for a lot of things, so I’ll be sure to use it. thanks so much @WoofWoof! :DDD

2 Likes

This is great! My school blocked downloads so github wouldn’t work, but now i can use this for my game, thanks!

3 Likes


i love this extension

5 Likes