MakeCode Arcade has a built-in countdown timer which works really well. It’s an easy way to add a timing element to your games. But, what if we wanted a stopwatch instead, where the timer counts up instead of down? @Dreadmask197 posed this question in a different thread, which inspired this post.
I also think this would be a good opportunity to show an example of how to plan a project. For small projects that are familiar to you, you might get away with just jumping into the code. However, for complex projects or projects with unfamiliar elements, many of us develop a plan before writing a single line of code.
This is going to be a long post. But, if you’re willing to go on a journey, then please join me!
Finished code
Here is a link to the finished version of the project. Feel free to run the project in the simulator. If you’re planning on walking through this journey with me, then please don’t look at the code yet. You don’t want to spoil the story! 
Developing the project plan
I’ve split this post into sections. Walk through the sections in order with me by clicking on the headings.
Project description
When writing a project plan, we start with a project description. The project description is a brief but complete statement that describes our project. We also can include a project name.
Here’s the start of my project plan:
Project name
MakeCode Arcade Stopwatch
Project description
This MakeCode Arcade project will display a stopwatch in a text sprite. The stopwatch will count up from zero. The player can start the stopwatch by pressing A. The user can pause the stopwatch also by pressing A.
Sprites
Because we are making a project in MakeCode Arcade, we need to think about sprites. What sprites do we need for this project? What do those sprites need to show, or what do they need to look like? Are there any properties that we need to set, like velocity or position?
Consider these questions and add to our project plan. Then, compare your notes with mine below. (Click on the spoiler text to view it.)
Sprites
Stopwatch sprite
- Text sprite
- Located at top center of screen
- Displays current timer in seconds
Events
MakeCode Arcade is an event-driven environment. Events are “things that happen” in our program, like collisions and button presses. What events do we need to consider in our program? When those events occur, what does our program need to do?
For this project, we only have one event that we need to handle. What should we do when the player pressed A? Add this information to your project plan. Then, compare your notes with mine below.
I’ll give you a hint: When the player presses A, two different things can happen. What are those two different actions? When would the first action happen, and when would the second action happen?
Events
Player presses A
- If the timer is running, then stop the timer.
- If the timer is stopped, then start the timer.
Variables
In the Events section, we noticed that one of our events depends on the current state of the program. If the timer is running, then we need to stop the timer when the player presses A. So, we need to keep track of whether the timer is running. To do that, we can use a variable.
There are other variables that we will need, but they may not be very obvious right now. That’s OK. We’ll deal with them later.
Add this to your project plan:
Variables
- IsRunning
- Data type: Boolean
- Indicates whether the timer is currently running.
- Value at start of the program:
false
Final project plan
Here is my final project plan. It doesn’t show all of the details, but it gives me a good starting place for our project.
Project name
MakeCode Arcade Stopwatch
Project description
This MakeCode Arcade project will display a stopwatch in a text sprite. The stopwatch will count up from zero. The player can start the stopwatch by pressing A. The user can pause the stopwatch also by pressing A.
Sprites
Stopwatch sprite
- Text sprite
- Located at top center of screen
- Displays current timer in seconds
Events
Player presses A
- If the timer is running, then stop the timer.
- If the timer is stopped, then start the timer.
Variables
-
timerIsRunning- Data type: Boolean
- Indicates whether the timer is currently running.
- Value at start of the program:
false
Building the project
Now that we have a plan, let’s start building the project! Join me in MakeCode Arcade, start a new project, and let’s build this together.
When starting a project, I typically add the information in the project plan to my code as comments. I do that because the project plan that I just wrote is really a “starter plan.” As I build a project, I add to this plan with more comments. By transferring my “starter plan” to my code, my code actually becomes my plan … it’s built right into it!
For this project, we won’t be adding these initial comments. We will, though, be adding other comments that will build on our “starter plan” that we have just created.
Text Sprite extension
In our project plan, we stated that we were going to use a text sprite to display our stopwatch. Text sprites are not built into MakeCode Arcade. We need to add an extension to our project.
If you have not used extensions before, then we need to take a little detour. Go through the Simple Extensions tutorial, found in the Tutorials section on the home page for MakeCode Arcade. Then, come back here to continue on your journey.
In your stopwatch project, add the arcade-text extension. You also can search for text sprite to find the extension.
Create the stopwatch sprite
We need to create a text sprite to show our stopwatch. We also need the ability to update the text in that sprite.
Let’s create the sprite first. Since we will be using it throughout our program, let’s create it in the on start block.

Let’s also format it a bit and place it at an appropriate location on the screen. These are just suggestions; feel free to style the sprite however you like!

Create other variables
If we look at our project plan, we mentioned that we need a variable that tracks whether the timer is running. Let’s create the variable now in the on start block.

Update stopwatch sprite
Now, let’s come up with a way to update the text sprite. We don’t know yet when we’ll need to update the text; we just know that we’ll have to at some point. This sounds like a perfect reason to use a function.
When writing a function, consider the following things:
- What information does our function need to know? Any information that our function needs to know would be good candidates for parameters. Parameters make our functions more flexible.
- What task does our function need to do? How will it use the information sent to it through the parameter(s)?
Create a function that updates the stopwatch sprite. Then, at the bottom of the on start block, call the function. For the parameters, pass initial information that seems reasonable to you. Then, compare your function and function call with the ones that I wrote below.

Button event handler
From our project plan, we know that we need to include an event handler for the A button. Let’s add that empty event handler to our project. Let’s also add a comment to remind ourselves what needs to happen when the player presses A.

Now, the description that we wrote for this event handler basically describes the code that we need to write. We don’t actually have a timer yet, but we do have a Boolean variable (also called a flag) that we need to change. Give it a try! What should our initial code look like for this event handler?
After you’ve written your code, compare it with my code below.
Basic version
If we take our description literally, we could write it like this:

Advanced version
We actually can write this block in a more compact way if we use a special logical operator: not.
With Boolean values, the not operator “flips” a value to the opposite. If a Boolean value is true, then not will switch it to false. If a Boolean value is false, then not will switch it to true.
When the player presses A, we “flip” the current value of timerIsRunning and then save it back to the variable:

Creating the basic timer
So, we’ve created a text sprite to display our timer, and we have the ability to start and stop the timer. Now, we just need to figure out how to actually keep time. This is the challenging part!
We have a block that we can use to help us keep time. You can find it in the Game drawer in the toolbox.

Notice the shape of this block. It’s round, which means it contains a value. In this case, the value is a number. This number represents that amount of time that has passed since the game has begun. Think of it as a clock; this value will tell you the current “time,” just like a clock does.
When the player presses A to start the timer, we can save this value so that we know what “time” the timer began. We can use variables to save information that we need later. Let’s do that now.

Now, let’s think about what we have.
- When the player presses A, we’re storing the “time” that happens in a variable. Pretend this has happened, and that we’ve stored 22 in
startTime. - At any other time afterward, the clock will have a different value. Let’s say the clock has a value of 37.
- How much time has gone by since the player pressed A?
- How do we calculate that value?
Let’s use this information to update the stopwatch sprite. Create an on update block. We’ll use this to update the timer whenever the game updates. Now, we should only update the stopwatch sprite when the clock is running. So, what should we place inside of our on update block first?
Once you’ve added that first set of blocks to on game update, check your work with mine.
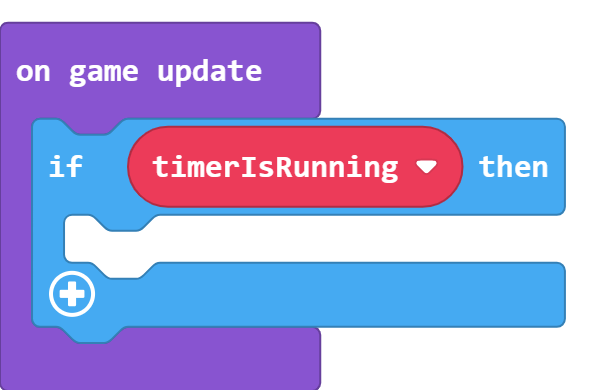
Now, think again about how we can calculate the time we need to update the stopwatch sprite. What code goes inside of that if block in the on game update loop? Give it a try! Once you think you have your code working correctly, compare it with mine below.

One last thing. Did you notice that the timer seemed to be counting very quickly? If we look at our new block again, we notice that it says time since start (ms). That (ms) means that the clock is being kept in milliseconds. There are 1,000 milliseconds in a second. So, we need to adjust the value that we send to updateStopWatch. Give it a try on your own, then compare your adjustment to mine below.

We’ve done it! We’ve created a basic stopwatch!
Next steps
In the next post, we’ll create a more advanced stopwatch that can be stopped and then started again.


 ).
).
