Hi there! I recently had the opportunity to know Microbit and introduced it to my 7 year old son. He loves it and often studies coding himself. I don’t know Python and Java script. So I teach my son conding in Block. But we are now stuck in the ‘radio raise event’ statement. The Help does not have any Block examples about ‘radio raise event’. Also, I can not googel any tutorial on this topic. So I would like to ask for help here to see if any master can give me some coding examples of the ‘radio raise event’ statement.
Thank you very much!
2 Likes
@Rocky yeah, that’s a weird one!
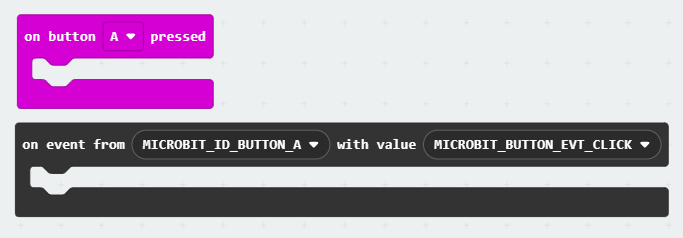
To understand this block, you need to understand that the micro:bit has something called an event bus. Whenever something happens on the micro:bit, an event is added to the bus. Other pieces of code can subscribe to the event bus so that whenever a certain event runs, the code gets executed. Every event on the event bus has two arguments, a source and a value. The source is whatever part of the micro:bit generated the event (the “accelerometer” for example) and the value is the type event that occurred (“tilt up”, “shake”, etc.)
Let’s look at a concrete example: say I wanted to run code whenever the A button is clicked. For that I would subscribe to the event source MICROBIT_ID_BUTTON_A and the event value MICROBIT_BUTTON_EVT_CLICK. In other words, these two blocks will do the exact same thing:
Now, as for that radio block, it allows you to send events on to the event bus of the receiving micro:bit. In other words, you could write a program that fakes A button presses on another one. In fact, here’s a program that does exactly that:
Press B on one micro:bit and it will trigger the “A button pressed” event on the other micro:bit and show a number on the screen
1 Like
Note that you can also define your own events to run on the event bus! Both the “source” and “value” arguments are actually just numbers, so you can put your own values in for either of them (note, value cannot be 0 because 0 is reserved for the special value “any event”). Just be careful that you don’t use any id that is already taken by another part of the micro:bit. You can find a list of all the taken IDs in this file
You can find all of the event blocks in the Control category underneath the “advanced” section.
1 Like
Hi Richard,
Thank you very much for your help!
But to be honest, I would not dig so deep to use the IDs file. It is too difficult for me. What I am doing is just to show my 7 year old son the basic function and coding in Microbit. If he is still interested, he need to go to some tutorial.
Anyway, thanks a lot for your help! Have a great day!
Kind regards,
Rocky
richard via Microsoft MakeCode <notifications@makecode.discoursemail.com> 于2024年3月5日周二 05:43写道:
Hi Richard!
Thank you so much for your help! Your explanations and examples are very clear and convincing, making me immediately understand how this command is used. This problem no longer bothers me now.
Have a great day!
Kind regards,
Rocky
richard via Microsoft MakeCode <notifications@makecode.discoursemail.com> 于2024年3月5日周二 05:39写道:
I too have found little to no information on how to use this block/feature. I don’t understand how to make it work between two separate micro:bits – putting the blocks in the example code linked above into an instance of makecode works fine in the simulator but the example used is “push button A on micro:bit 1, trigger button B push on micro:bit 2.” However, when I tried to have “push button A on micro:it 1 to trigger button A push on micro:bit 2 remotely” (the whole point of a remote, imo), then it just grays out half the blocks because they are conflicting (obviously).
If I remove them to a separate program to download for the remote, then micro:bit 1 doesn’t have any way of knowing that it should look for a radio trigger, unless I use the usual “on radio receive + value” system, which I thought this was a more elegant solution to in the first place??
